写在前面
本篇主要是在对Oracle有关RMI的教程学习后的总结笔记,原文请参考官方文档;
在本文的阅读中,我们将一起将一起了解:
- 什么是RMI?为什么要用RMI?
- RMI的实例讲解;
- RMI的通信过程;
什么是RMI?为什么要用RMI?
Java Remote Method Invocation, RMI系统,其目的是为两个不同的JVM之间提供桥梁,使得其中一个JVM可以操作(调用方法等)另一个JVM中的对象;
Figure 1: RMI Architecture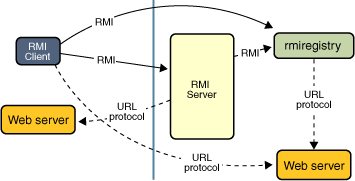
一个RMI应用,一般包含两个独立的角色(程序),一个 server, 一个 client:
- Server 是用来创建 remote objects 远程对象, 这些远程对象可以被外界访问,并调用其中的方法;
- Client 就是来获取 server 所创建的远程对象,并调用其中方法的程序;
就像之前提到的那样, RMI 的角色就是在 server 与 client 之间提供一座桥梁,使以上远程调用的功能得以实现,因此其也被称为 Distributed Object Application;
那么要实现这个应用,我们需要做三件事情:
- Locate remote objects, 加载远程对象;
- 这里我们假设 remote object 指的是Server上的一个对象,而client需要去进行调用这个对象;
- 那么双方都需要知道对方想要调用的是哪一个对象,就需要一种方法来唯一确定;
- RMI registry: 利用RMI注册表来将对象以及其简名唯一对应起来,让双发都可以了解这种唯一的对应关系;
- 或者直接在调用中传递(没有理解);
- Communicate with remote objects, 远程之间互相通信;
- 在server以及client双方看来(在写java代码的时候),他们都只是在调用一个本地对象;
- 而其中复杂的操作全都由RMI在背后完成;
- Load class definitions for objects, 加载通信中用到的对象的类定义;
- 在RMI辅助对象进行远程通信的过程中时,会出现对象的交换,而这些对象的定义往往只处于一方的项目代码中;
- RMI会直接将这些对象的定义直接传递(序列化);
上面的介绍可能经过我的理解以及简化之后稍微好懂一点了,但大概率读者们还是一头雾水,说到底我们还是需要一个具体的例子来明白其中的原理以及所有抽象名词的定义:
接下来,我们就要实现一个RMI应用,Server代表一台学校实验室拥有的性能强大的计算机,可以用来解决各种任务;而Client则是我们的学生的PC,需要借助Server来进行复杂的计算;
构造RMI server
之前我们说了,Server是学校实验室所配置的一台高性能服务器,现在我们需要通过RMI,将这台计算机开放给学生的PC来完成计算工作;
设计一个Remote接口
接下来,我们将Server称为 Compute Engine 来表示其是用来进行计算的引擎,而这个引擎的设计核心思想就是无论 client 发来任何的任务,它都能够顺利执行,并且能够将计算的结果顺利地返回给client,与client的通信如下图所示:
Figure 2: Server与Client之间的远程通信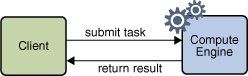
根据我们之前的介绍,client可以远程调用这个engine远程对象来执行它们想要完成的任务,而RMI会将这个任务发送给Compute Engine本身来执行,因此要实现这样一个 remote object 远程对象,就需要定义一个继承了 Remote 接口的接口,并实现这个接口:
- 实现Remote接口可以让对象中的方法在其他JVM上被调用;
- 同时需要抛出 RemoteException 接口;
package compute;

import java.rmi.Remote;
import java.rmi.RemoteException;

public interface Compute extends Remote {
    // <T>表示这个方法是一个泛型方法,然后才能用T表示其返回类型为泛型;
    <T> T executeTask(Task<T> t) throws RemoteException;
}
接着我们需要定义一个 Task 泛型接口,来表示 Compute Engine 会执行各种类型的任务;
这个接口的对象并不需要被远程调用方法,因此也不需要继承Remote接口;
package compute;

public interface Task<T> {
    // 这里没有申明<T>是因为本身就是泛型接口中的方法;
    T execute();
}
值得一提的是,在 Compute Engine 执行 Task 的过程中,难免需要用到一些只定义在的 client 端的对象,此时RMI一般就会用序列化的方式来传递这些对象的类定义;
实现Remote接口
实现Remote接口意味着这个类的实例对象是一个 remote object 可以被远程调用,这里就涉及到了在RMI中,Server-Client之间对象的传递,规则如下:
- 对于RMI所传递的 Remote objects 来说,传递的是引用:
- 在我们的例子中,
ComputeEngine类实现我们之前定义的,继承了Remote接口的Compute接口,它的实例对象就可以被称为 Remote object:
- 创建构造器;
- 实现接口中的方法;
package engine;

import java.rmi.RemoteException;
import java.rmi.registry.LocateRegistry;
import java.rmi.registry.Registry;
import java.rmi.server.UnicastRemoteObject;
import compute.Compute;
import compute.Task;

public class ComputeEngine implements Compute {

    public ComputeEngine() {
        super();
    }

    public <T> T executeTask(Task<T> t) {
        return t.execute();
    }

}
接着我们要将这个类变成一个通过RMI与client进行通信的Server,那就需要实现main方法,并完成以下三个步骤:
- 构建并注册一个 Security Manager;
- 构建并导出remote objects(作为本地的stubs);
- 在RMI registry(或者其他的 naming service)上注册remote object;
public static void main(String[] args) {
    // 1. Create and install a security manager
    if (System.getSecurityManager() == null) {
        System.setSecurityManager(new SecurityManager());
    }
    try {
        String name = "Compute";
        // 2. Create and export one or more remote objects
        Compute engine = new ComputeEngine();
        Compute stub =
            (Compute) UnicastRemoteObject.exportObject(engine, 0);

        // 3. Register at least one remote object with the RMI registry for bootstrapping purposes
        Registry registry = LocateRegistry.getRegistry();
        registry.rebind(name, stub);
        System.out.println("ComputeEngine bound");
    } catch (Exception e) {
        System.err.println("ComputeEngine exception:");
        e.printStackTrace();
    }
}
接着,我们逐一来解释这些步骤的目的;
Security Manager
// 1. Create and install a security manager
if (System.getSecurityManager() == null) {
    System.setSecurityManager(new SecurityManager());
}
SecurityManager是一个可以赋予应用其自定义安全策略的类。它允许一个应用在执行一些有风险的操作之前对操作进行审核,并做出是否执行的决定。Java库中已经定义了很多以 check 开头的方法来检查各种操作。
Figure 3: SecurityManager#checkXXX(…)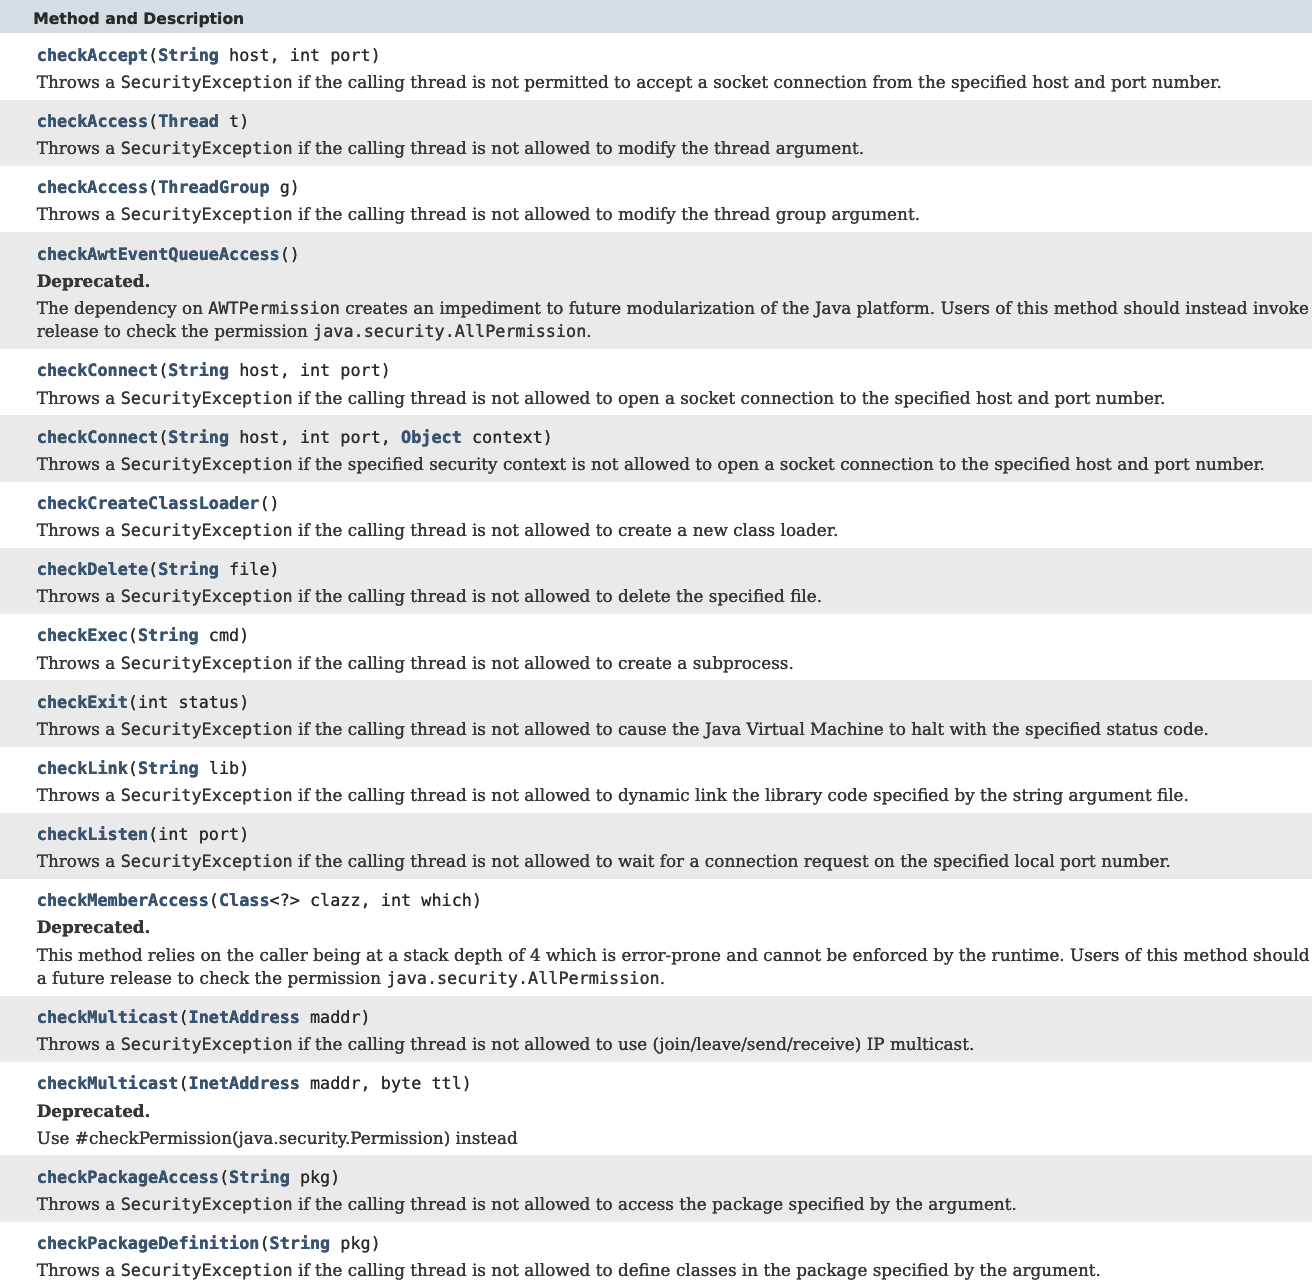
由于在Server-Client之间的通信中,不可以避免地会出现对象的类定义的下载,因此为了保护Server不会执行一些危险的操作,需要设置 Security manager 来进行保护。
RMI中对象的传递
String name = "Compute";
// 2. Create and export one or more remote objects
Compute engine = new ComputeEngine();
Compute stub =
    (Compute) UnicastRemoteObject.exportObject(engine, 0);
Server-Client之间通信的本质就是对象的交换,而对于不同类型的对象交换的方式有所不同:
- Remote objects, 对于远程对象来说,传递的是 引用:
- 在我们的例子中,engine是真实的对象,而stub以及之后会提到client中的engine对象都是引用;
- 也就是说,任意一个发生改变,其他的都会发生改变
- 同时,在传递的过程中,只有在remote接口中定义的抽象方法才会进行传递,也就是说,只有
executeTask()才会传递,而本地的构造器则不会传递;
- Local objects, 对于本地对象来说,有时候会被包含在远程对象中进行传递,这里传的就是拷贝的对象;
engine 对象通过 UnicastRemoteObject.exportObject 方法导出其引用 stub 对象,来接受来自远程的调用,其中,第二个参数表示的是监听远程调用的TCP端口(0表示由RMI或者操作系统选择的匿名端口);
注意这里 stub 的类型是Compute,这就是我们之前说的,只有定义在 remote object 中的方法才能被调用。
RMI registry注册Remote objects
// 3. Register at least one remote object with the RMI registry for bootstrapping purposes
Registry registry = LocateRegistry.getRegistry();
registry.rebind(name, stub);
System.out.println("ComputeEngine bound");
最后一步就是要将 stub 注册到RMI registry中去,既而Client就可以从RMI registry中获取到远程对象的引用来进行远程方法调用了;
public interface Registry extends Remote
Registry是一个继承了remote接口的接口,其目的是为了以 引用-名字 的形式存储以及获取远程对象;
LocateRegistry类提供了在本地JVM中构造以及获取一个Registry注册表的方法;
本地JVM中的Registry一般监听1099端口,如果更换了接口,就需要在 LocateRegistry.getRegistry 中添加 int 参数来获取本地 Registry 的引用;
构造RMI client
在RMI client这一方,我们的目标就是能够调用在服务器上运行的 Computer Engine, 同时定义自己的Task用来传递给Server来运行;
那么实现的就是两个类:
- Pi 类, 实现 Task 接口,表示Server上的Engine需要运行的任务;
- 这里具体指的是计算特定位数的π值;
- ComputePi 类,用来调用远程的 Compute 对象来进行计算;
ComputePi
我们先来看最相关的这个 ComputePi 类:
-
第一步还是我们熟悉的 SecurityManager 的设置:
- 由于client端调用来自server的 remote objects 可能涉及到类定义的下载,而这个必须要在SecurityManager的保护下才能发生;
-
接着我们就可以先获取Server上的 RMI Registry;
- 通常来说,client会去寻找目标主机的1099端口来获取registry, 也可以自己设置;
- 接着利用registry的
lookup()方法来来根据注册远程对象的名字来获取远程对象的引用;
-
最后就可以调用这个远程对象comp来完成我们所设定的任务了;
package client;

import java.rmi.registry.LocateRegistry;
import java.rmi.registry.Registry;
import java.math.BigDecimal;
import compute.Compute;

public class ComputePi {
    public static void main(String args[]) {
        if (System.getSecurityManager() == null) {
            // 1. 设置SecurityManager;
            System.setSecurityManager(new SecurityManager());
        }
        try {

            String name = "Compute";

            // 2. 获取registry的引用,args[0]为远程对象所位于的主机的名字;
            Registry registry = LocateRegistry.getRegistry(args[0]);

            // 3. 接着利用invoke
            Compute comp = (Compute) registry.lookup(name);
            Pi task = new Pi(Integer.parseInt(args[1]));
            BigDecimal pi = comp.executeTask(task);
            System.out.println(pi);
        } catch (Exception e) {
            System.err.println("ComputePi exception:");
            e.printStackTrace();
        }
    }
}
Pi
Pi类实现了Task<BigDecimal>接口以及Serializable,这将使其具备被 Computer Engine 执行,并通过序列化的形式传递类定义的条件。
Pi#execute(int digit)可以用来计算对应位数的π符号,这里就不做赘述具体的实现方法了;
不过值得一提的点在于,我们在Server端的 Compute 以及 Compute Engine 的定义中,从未考虑过Pi类,只有当 Pi 类的实例对象,随着 executeTask() 方法通过RMI传递到Server的JVM时,其类定义才会被下载,包括其中所定义的其他对象的类定义,这也就意味着 Compute Engine 可以执行任意类型的任务,因此也体现了 SecurityManager 的重要性,如果不加注意,可能会造成很严重的安全事故;
package client;

import compute.Task;
import java.io.Serializable;
import java.math.BigDecimal;

public class Pi implements Task<BigDecimal>, Serializable {

    private static final long serialVersionUID = 227L;

    /** constants used in pi computation */
    private static final BigDecimal FOUR =
        BigDecimal.valueOf(4);

    /** rounding mode to use during pi computation */
    private static final int roundingMode =
        BigDecimal.ROUND_HALF_EVEN;

    /** digits of precision after the decimal point */
    private final int digits;

    /**
     * Construct a task to calculate pi to the specified
     * precision.
     */
    public Pi(int digits) {
        this.digits = digits;
    }

    /**
     * Calculate pi.
     */
    public BigDecimal execute() {
        return computePi(digits);
    }

    /**
     * Compute the value of pi to the specified number of
     * digits after the decimal point.  The value is
     * computed using Machin's formula:
     *
     *          pi/4 = 4*arctan(1/5) - arctan(1/239)
     *
     * and a power series expansion of arctan(x) to
     * sufficient precision.
     */
    public static BigDecimal computePi(int digits) {
        int scale = digits + 5;
        BigDecimal arctan1_5 = arctan(5, scale);
        BigDecimal arctan1_239 = arctan(239, scale);
        BigDecimal pi = arctan1_5.multiply(FOUR).subtract(
                                  arctan1_239).multiply(FOUR);
        return pi.setScale(digits,
                           BigDecimal.ROUND_HALF_UP);
    }
    /**
     * Compute the value, in radians, of the arctangent of
     * the inverse of the supplied integer to the specified
     * number of digits after the decimal point.  The value
     * is computed using the power series expansion for the
     * arc tangent:
     *
     * arctan(x) = x - (x^3)/3 + (x^5)/5 - (x^7)/7 +
     *     (x^9)/9 ...
     */
    public static BigDecimal arctan(int inverseX,
                                    int scale)
    {
        BigDecimal result, numer, term;
        BigDecimal invX = BigDecimal.valueOf(inverseX);
        BigDecimal invX2 =
            BigDecimal.valueOf(inverseX * inverseX);

        numer = BigDecimal.ONE.divide(invX,
                                      scale, roundingMode);

        result = numer;
        int i = 1;
        do {
            numer =
                numer.divide(invX2, scale, roundingMode);
            int denom = 2 * i + 1;
            term =
                numer.divide(BigDecimal.valueOf(denom),
                             scale, roundingMode);
            if ((i % 2) != 0) {
                result = result.subtract(term);
            } else {
                result = result.add(term);
            }
            i++;
        } while (term.compareTo(BigDecimal.ZERO) != 0);
        return result;
    }
}
编译和运行实例
至此我们就已经完成了所有的开发工作,接下来就是编译以及运行我们的Server以及Client了,我们还是根据Oracle的教程来继续走,离开IDE来看看到底是如何一步步运作的。
编译
在真实的工作场景中,Server与Client肯定是由不同的开发者来负责,所以可能的场景就是:
- Server端的开发者
- 将 Compute 以及 Task 接口打包成JAR包以供Server以及Client来使用;
- 接着继续实现 Compute Engine 并将这个服务启动,以供Client来调用;
- Client端的开发者
- 利用包含 Compute 以及 Task 接口的JAR包来开发其需要执行的 Task 类以及 Client 类;
接下来我们来看看具体的操作
打包Jar包
Microsoft Windows:
cd [src dir]
javac compute\Compute.java compute\Task.java
jar cvf compute.jar compute\*.class
Solaris OS or Linux:
cd [src dir]
javac compute/Compute.java compute/Task.java
jar cvf compute.jar compute/*.class

Output:
added manifest
adding: compute/Compute.class(in = 319) (out= 208)(deflated 34%)
adding: compute/Task.class(in = 221) (out= 152)(deflated 31%)
其中jar的参数:
-c  create new archive
-v  generate verbose output on standard output
-f  specify archive file name
如此我们就得到了一个jar包,现在将这个jar包分别放在Server以及Client的应用中,以供他们调用;
构建Server
Microsoft Windows:
cd [src_dir]
javac -cp path\to\compute.jar
    engine\ComputeEngine.java
Solaris OS or Linux:
cd [src_dir]
javac -cp path/to/compute.jar
    engine/ComputeEngine.java
-cp <path> Specify where to find user class files and annotation processors
构建Client
Microsoft Windows:
cd c:\home\jones\src
javac -cp path\to\compute.jar
    client\ComputePi.java client\Pi.java
Solaris OS or Linux:
cd [src_dir]
javac -cp path/to/compute.jar
    client/ComputePi.java client/Pi.java
编译后的class文件的存放
Oracle的建议是经过编译之后的这些class文件,都需要放在 network accessible location, 即网络可以访问的位置,以便在远程通信的时候,方便下载实例对象的对应的类定义;
运行
安全策略
我们之前提到了,因为涉及到类定义的下载交换,我们在 Server 以及 Client 端都设置了 SecurityManager, 那我们就需要为其设置安全策略,分别放置在 server.policy 以及 client.policy 文件下:
server端的安全策略:
grant codeBase "file:/path/to/src/" {
    permission java.security.AllPermission;
};
client端的安全策略:
grant codeBase "file:/path/to/src/" {
    permission java.security.AllPermission;
};
启动Server
在启动我们构建的 Compute Engine 之前,我们需要先在Server端启动 RMI registry 用来存储以及供应 remote object:name 的信息,RMI registry默认的端口是1099,我们当然也可以指定其监听其他端口;
Microsoft Windows (use javaw if start is not available):
start rmiregistry # default port is 1099
# or
start rmiregistry 2001
Solaris OS or Linux:
rmiregistry & # default port is 1099
# or
rmiregistry 2001 &
Figure 4: RMI registry默认监听1099端口
接着我们执行computeEngine,注意这里需要将我们的 ComputeEngine.class 以及 compute.jar 给添加到 $CLASSPATH 上去,不然java就找不到这两个类来执行,后面在client执行的时候同理;
Microsoft Windows:
java -cp c:\home\ann\src;c:\home\ann\public_html\classes\compute.jar
     -Djava.rmi.server.codebase=file:/c:/home/ann/public_html/classes/compute.jar
     -Djava.rmi.server.hostname=mycomputer.example.com
     -Djava.security.policy=server.policy
        engine.ComputeEngine
Solaris OS or Linux:
java -cp /home/ann/src:path/to/compute.jar
     -Djava.rmi.server.codebase=http://path/to/compute.jar
     -Djava.rmi.server.hostname=mycomputer.example.com
     -Djava.rmi.server.useCodebaseOnly=false
     -Djava.security.policy=server.policy
        engine.ComputeEngine
java -cp ./:./compute.jar -Djava.rmi.server.codebase=http://localhost/compute.jar -Djava.rmi.server.hostname=localhost -Djava.rmi.server.useCodebaseOnly=false -Djava.security.policy=server.policy engine.ComputeEngine
- codebase, computer.jar可以被下载的URL(记得我们刚才说的,network accessible location);
- hostname, hostname定义了会被放到 stubs(remote objects)中的IP地址或者域名,方便client来调用;
- policy, server端的安全策略
这里我的增加了 -Djava.rmi.server.useCodebaseOnly=false 这个option,根据参考的文章,oracle的教程中命令有点早了,如果在执行Client命令时出现 Pi.class 找不到的情况,可以加上这个选项重新尝试,目的是让Server端可以在本地的CLASSPATH上找到类定义,远程的我没有尝试就不做猜测了;
启动Client
启动Client之前也要记得将要执行的 computePi.class 添加到 $CLASSPATH 中去;
接着需要将codeBase设置为Pi.class所在的目录(记得最后要加’/’),方便传递类定义;
同时要加上参数,表示寻找 stub 的hostname,以及要计算的Pi的位数(digit);
Microsoft Windows:
java -cp [src_dir];\path\to\compute.jar
     -Djava.rmi.server.codebase=file:/path/to/Pi.class/
     -Djava.security.policy=client.policy
        client.ComputePi [host_name] [digit]
Solaris OS or Linux:
java -cp [src_dir];/path/to/compute.jar
     -Djava.rmi.server.codebase=/path/to/Pi.class/
     -Djava.security.policy=client.policy
        client.ComputePi [host_name] [digit]
java -cp ./:./compute.jar -Djava.rmi.server.codebase=file:///Users/runfeng/IdeaProjects/JavaSec/src/RMI_Client/ -Djava.security.policy=client.policy client.ComputePi localhost 45
结果: 3.141592653589793238462643383279502884197169399
当 ComputeEngine 在 RMI Registry 上注册 remote object时, RMI registry会根据 codebase 去对应的URL或者文件系统中加载 Compute 以及 Task 的定义;
而 Compute Engine 在执行 ComputePi 任务的过程中,其也会去由Client提供的 codebase 下载对应的类定义;
Figure 5: RMI通信框架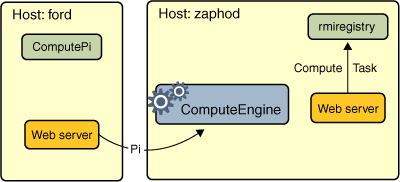
RMI的通信过程
我们先后在Server启动以及Client启动之后观察Wireshark中的抓包情况,其实就能更好的理解整一个框架,即Server(50074)-RMI Registry(1099)-client(50089)三者之间的通信关系:
Figure 6: Server启动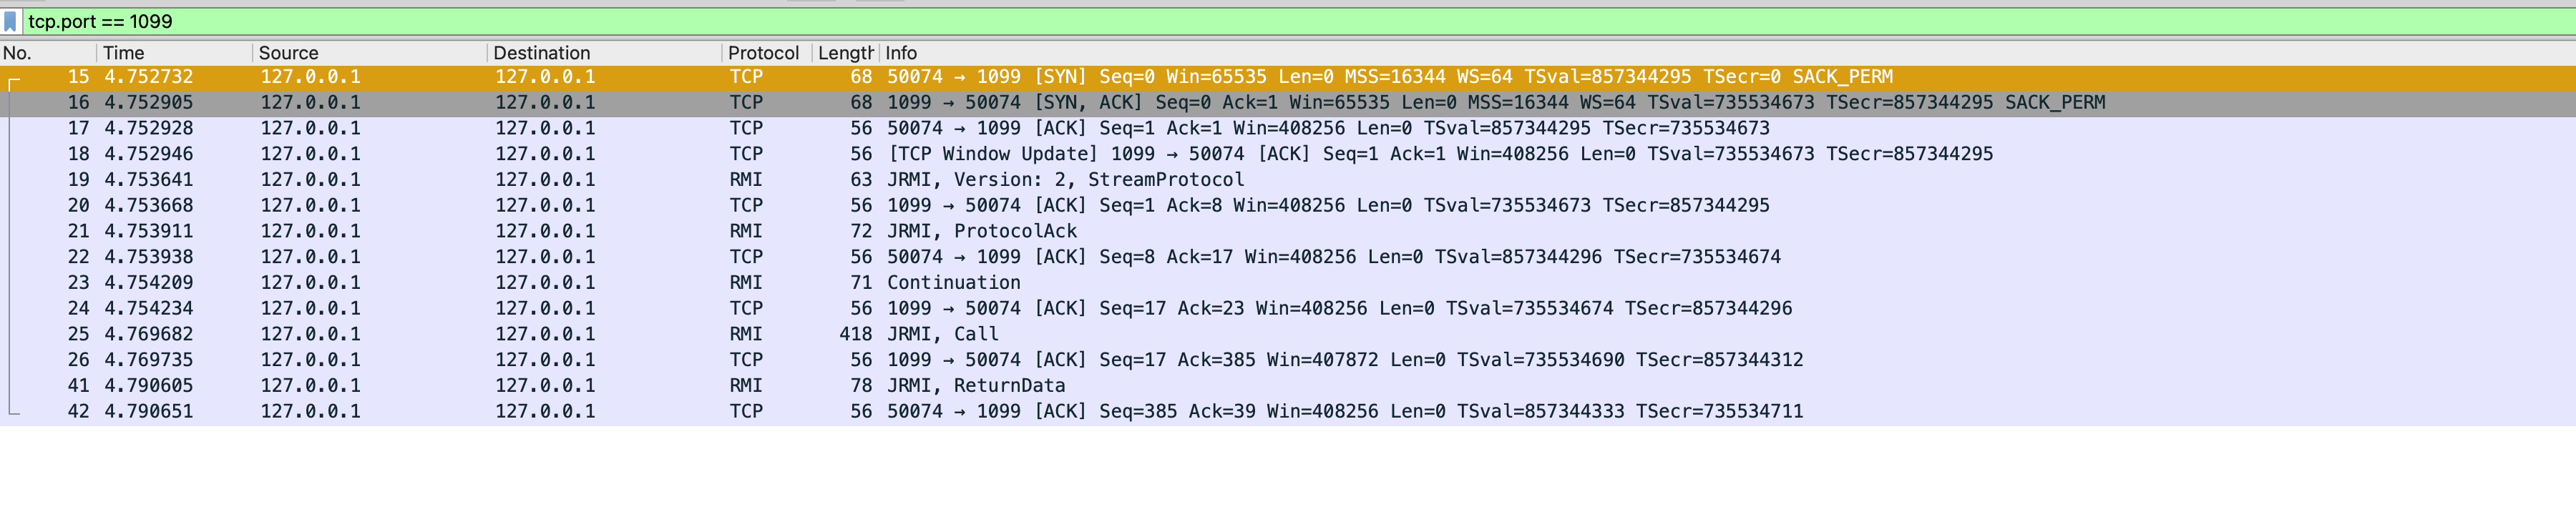
Figure 7: Client启动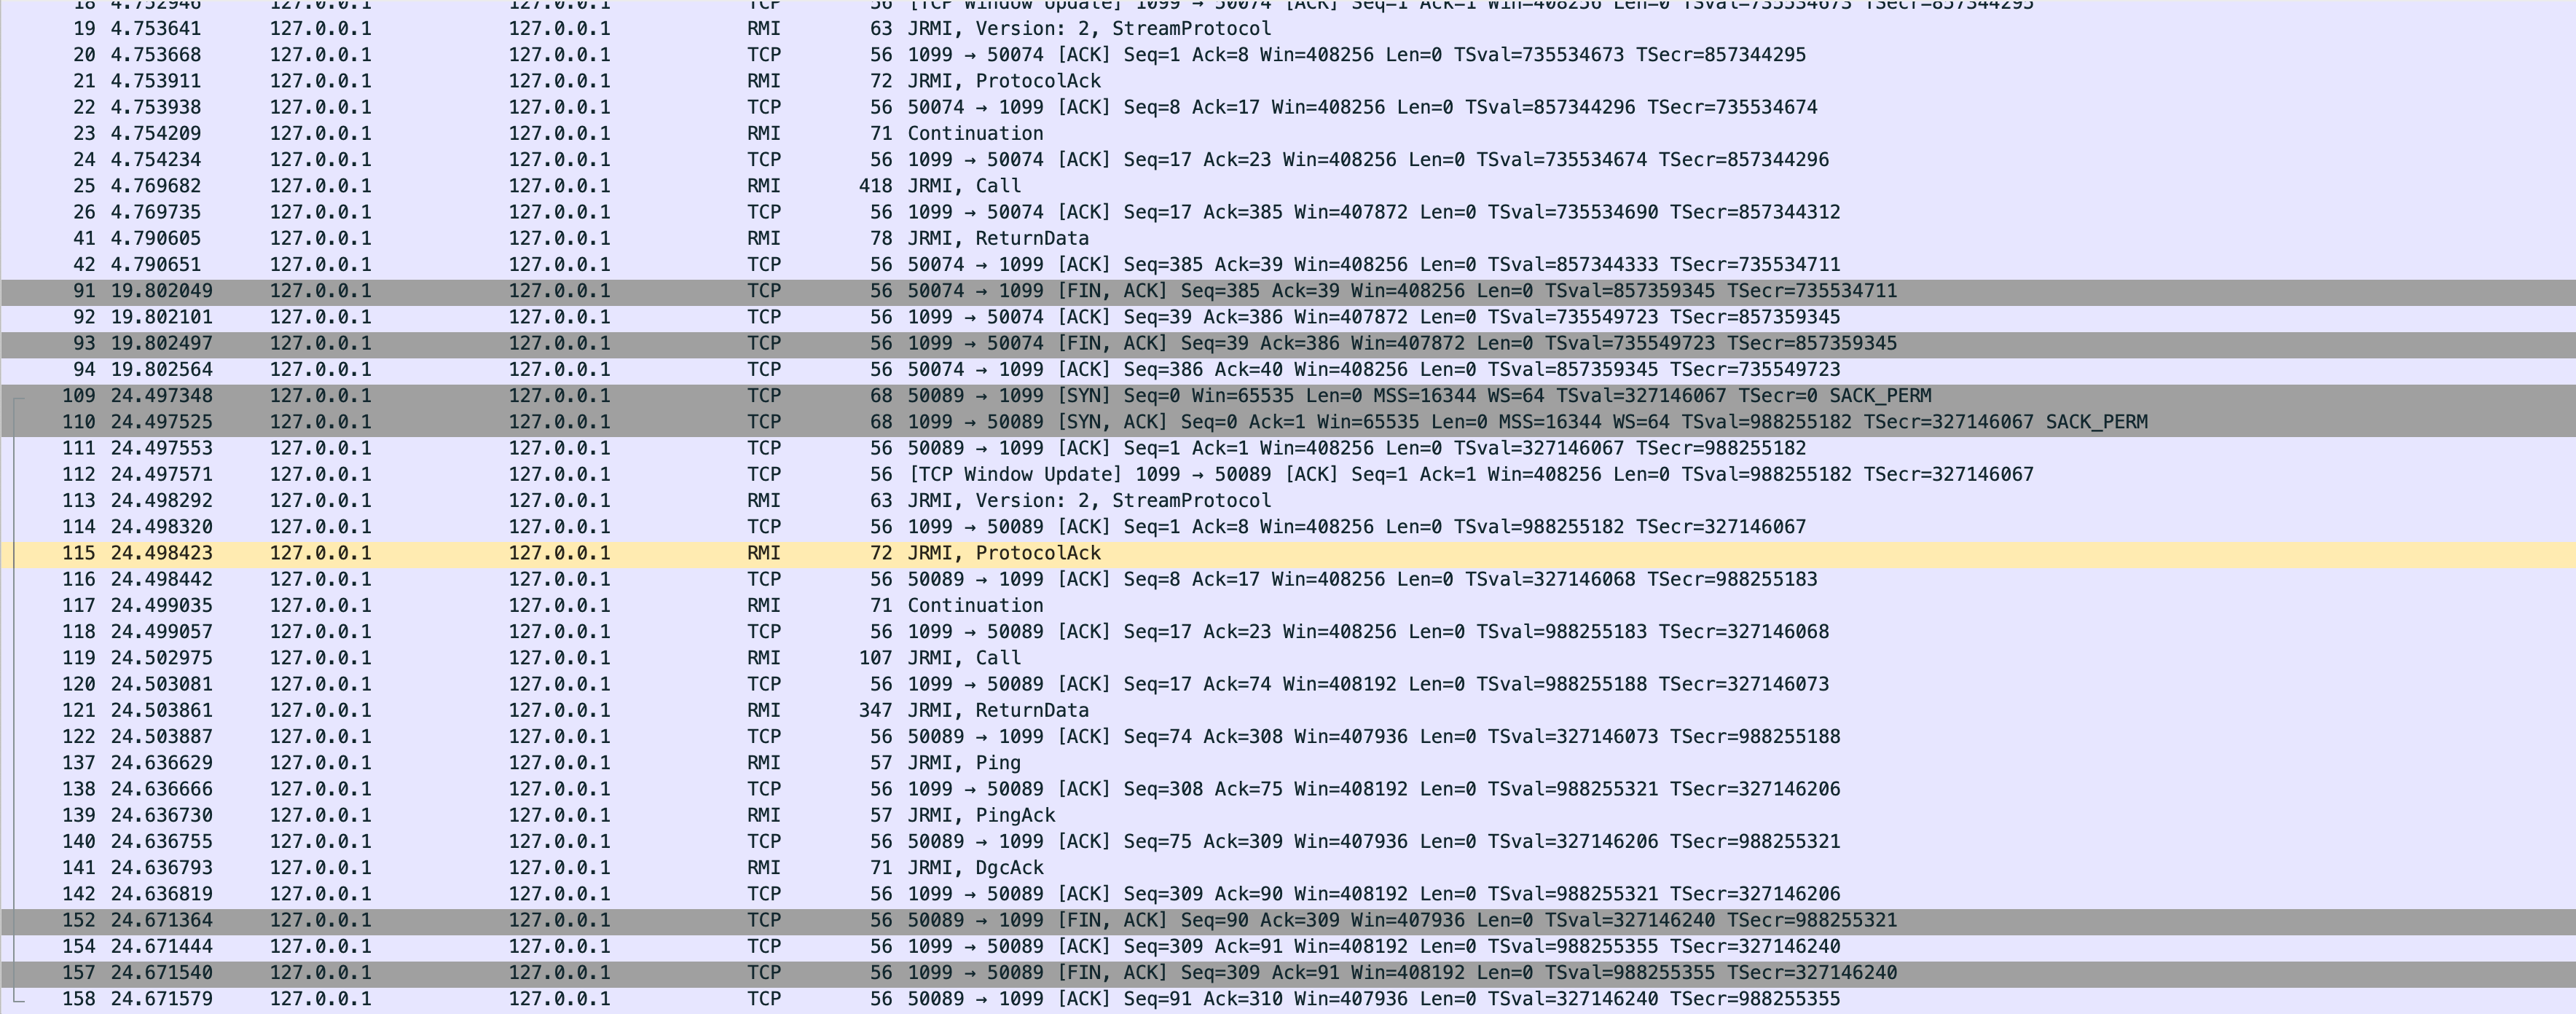
拓展阅读
Java Remote Method Invocation Distributed Computing for Java
Figure 8: ORACLE RMI Paper Overview
写在后面
本篇主要是跟着Oracle的文档一起学习,文档的内容其实不多,但是讲解的很细致,不过有时候太细致就会让人有点摸不着头脑(越来越多的没见过的名词),好在都会重复出现;
通过整一个例子的复现,我们了解了RMI的基础使用,一些在真实开发过程中要遵循的原则以及标准,相信在之后的学习中能够更好的帮助我们了解RMI以及序列化的内容。
Reference
[1] ‘Trail: RMI (The Java™ Tutorials)’. https://docs.oracle.com/javase/tutorial/rmi/index.html . [2] ‘The Security Manager (The Java™ Tutorials > Essential Java Classes > The Platform Environment)’. https://docs.oracle.com/javase/tutorial/essential/environment/security.html. [3] ‘Trail: RMI (The Java™ Tutorials)’. https://docs.oracle.com/javase/tutorial/rmi/index.html . [4] ‘Java Remote Method Invocation Distributed Computing for Java’. https://www.oracle.com/java/technologies/javase/remote-method-invocation-distributed-computing.html . [5] ‘java - 执行客户端RMI时出错 - Thinbug’. https://www.thinbug.com/q/30516039.